Hello, once again! I'm managing to squeeze one more post on here to wrap up the year!
I just received some pics my family and I took the last weekend of TRF (Texas Renaissance Festival) and wanted to share some of them with you. While walking up to the main gate, we saw this girl, whom I believe was named Stephanie (please forgive me if I'm wrong). When I saw her belt I had to run up and introduce myself and get some pics. She made a really original jingly belt out of ... you guessed it ... can tabs. And, a lot of them, too!
I like how she strung them at the top and hung chains of them around the bottom. It still amazes me how many different ways you can use these things! Here is a closer look:
Hope "Stephanie" stops by here to see her belt. She was so kind to let us bug her.
Well, that is just about it for this year. It's been a great one. Looking forward to continuing on into the next. I have many projects still in the works for future posts.
A BIG Thank you to everyone who has taken an interest in this blog. You guys are great! And, I have good news! I may have a blog contest lined up soon! I will be giving away some of my pieces. I'm also wondering if any of you would like to craft some creative tabistry masterpieces for prizes. Let me know if it sounds like a fun idea. So, keep checking back for details. HAPPY NEW YEAR!!!!
Wednesday, December 30, 2009
Sunday, December 13, 2009
Happy Holidays!
I can not believe Christmas is so close! Where has this year gone?! I think someone has been swiping days from me while I was busy crafting! :) But I do have one more project to show for my efforts.
A full-size tabistry holiday stocking as promised. I used polar fleece strips to weave it. I attempted a pattern on each side using silver and green tabs, but it is hard to see it unless you hold it at just the right angle. One side is candy-striped will the other is a diamond pattern. I'll try to shoot some pics that actually show both patterns when I get a chance.
Wasn't sure I would get this stocking finishing in time, but I did it! Having some frustration getting to know to the new camera. (I lost my old one at faire.) At least the colors are not as oversaturated. They just don't seem as clear to me, though.
I've entered this stocking in a couple holiday contests. If you would like to, I'd love some votes.
You vote once per day at Greenwala here.
Or, vote for me at: Michaels Photo Entry
I've got a few other items I'm going to try to get finished before the year ends. Wish me luck!
HAPPY HOLIDAYS, EVERYONE!!
A full-size tabistry holiday stocking as promised. I used polar fleece strips to weave it. I attempted a pattern on each side using silver and green tabs, but it is hard to see it unless you hold it at just the right angle. One side is candy-striped will the other is a diamond pattern. I'll try to shoot some pics that actually show both patterns when I get a chance.
Wasn't sure I would get this stocking finishing in time, but I did it! Having some frustration getting to know to the new camera. (I lost my old one at faire.) At least the colors are not as oversaturated. They just don't seem as clear to me, though.
I've entered this stocking in a couple holiday contests. If you would like to, I'd love some votes.
You vote once per day at Greenwala here.
Or, vote for me at: Michaels Photo Entry
I've got a few other items I'm going to try to get finished before the year ends. Wish me luck!
HAPPY HOLIDAYS, EVERYONE!!
Labels:
accessories,
christmas
Thursday, December 10, 2009
Beth's Pirate Corset
While busy at faire and trying to finish up some new things I've been working on, I started posting a lot of different artist's works made with tabs and adding them to a gallery page. You folks have sent so many amazing pics of some really unique pieces that I just had to share them with everyone! Keep them coming! I would like to keep featuring new artists on a weekly basis if possible.
This week I'm featuring Beth's (daughter's) pirate corset:
This is a Beth's daughter modeling her new garb. Beth wanted to make her daughter a pirate corset like mine. So, awhile back we arranged a swap for the pattern. I also helped her start the front panels and she did a great job continuing the rest. She also made the black skirt and her lovely and talented daughter made the red crocheted hat she is wearing. Beth tells me her daughter loved how the corset turned out and got lots of compliments at faire. Yay!
Here are some more pics of the front and back:
She chose to use my original pattern with a little resizing but with the contrasting red back panels where mine just wraps around from the sides in black. I think the back panels really make it look more interesting and finished.
For her end of the swap, together they crocheted my daughter and me some wonderful items, which I have been so rude not to share pics of until now.
Beth made this gray hat and scarf set and the most adorable stuffed Koala bear amigurumi:
And, her daughter made this orange hat:
The pom pom tops were added by us. My daughter was insisting they both needed the poms. I just happened to have a yarn that was close enough to the last one. She wore the orange one to "Hat Day" at school in October.
Thanks so much for swapping with us, Beth. We'd love to do it again, soon!
Labels:
other artists
Monday, November 16, 2009
Rob's Can Tab Cupid
At least she reminds me of a cupid in the first photo above. The comfort of this two piece warrior woman set is in question, but it sure is a lovely and unique outfit.
Here are some other designs, too.
Rob Emery's warrior woman designs are created out of 100% recycled aluminum. Not only are the tabs aluminum, but aluminum strips from used cans were used to weave the tabs together. Outstanding job! Using all aluminum really makes the tabs shine. When asked about the story of these outfits, this was part of the reply:
"I got into the habit of collecting tabs for a friend's school's charity but when they stopped collecting the habit stuck. Eventually I thought, maybe I could make some chainmail out of that. I tried a few iterations with tabs alone and with aluminum wire but didn't like the look - plus I was keen to make them without any other materials..." - Rob
Using nothing but aluminum must really have been a challenge! Kudos for the successful execution. Though, I pray this one never gets re-recycled!
"...I have one more suit not published yet (looking for the right model still). I am also working on a male armour suit now, with a shirt (sleeveless hauberk) and maybe pants (or at least shorts and greaves) too, though I'll have to get creative to make some knees that can bend more than a few dozen times." - Rob
Good luck with the future projects Rob! I really hope you find your solution for the knees. We're looking forward to seeing your results. Thanks for sharing!
******************************************
After viewing the portfolio website where these images are displayed, Rob appears to be an extremely multi-talented artist being able to draw, sculpt, and make costumes and props equally well (and is gifted at photography, too!) To see other nontabistry works, stroll over to rob.emery.net for a peek.
Don't forget to vote for these outfits in Greenwala's Eco-Chic Contest! You can vote up to once PER DAY for your favorite!
To view past tabistry work by others featured here, go to the Visitor's Gallery.
Labels:
other artists
Monday, November 9, 2009
Image Viewing Problem
Yikes! Bandwidth Exceeded!
You may have noticed some of my images aren't showing up these days. I just wanted to let everyone know that this is a temporary problem. Should be back to normal around the 18th of this month. I was using Photobucket.com to host my images, and it seems they only allow a limited amount of traffic every month for non pro accounts. If this happens again, I will move the images to a new host. Or, I may have to consider taking up donations to open a pro account in the future.
Sorry for the inconvenience.
Mieljolie
Labels:
announcement
Tuesday, November 3, 2009
Joani's Coif and Market Bag
Time to share some more tabistry created by another amazingly creative artist. This one blew me away when I saw it. Joani was inspired by my hat tutorial to create this awesome coif for her man.
She got the fit so perfect. I'm very impressed! But, not only did she manage that, she also designed her own "Market Bag" for carrying her reusable grocery bags. What a clever idea! Looks pretty cool, too.
She is so sweet to boot. She left me some really kind feedback on Etsy.com, and also commented:
"This is by far the easiest method I've tried for creating things with tabs and the results are great. Your blog inspires me to try new ideas." - Joani
I blush. I'm glad I was able to inpsire her to give it a try. Her creativity is wonderful! I asked her a few other questions, which she graciously took some time to answer for us.
>What inspired you to try tabistry?
"I've tried making things out of can tabs before (crocheted belts & purses). It was hard to crochet. I've tried linking them with chainmail rings. I've tried cutting and bending them. Your method looked much easier (and it was!)." - Joani
>How long did your project take?
"4 evenings to make the market bag (3 or 4 hours each night) and about the same for the coif." - Joani
>Approximately how many tabs went into making your project?
"The market bag took about 2500 tabs. The coif took 2352 tabs. We already had the tabs, so the projects were fairly inexpensive. The coif used about a yard of grey t-shirt material ($5). The market bag we used a spool of black ribbon yarn we got at the dollar store, so that was only $1. :)" - Joani
>Will you be making any future tabistry projects?
"Definitely. I'm going to make some more market bags, and might try some more of your other patterns. I am thinking of making a roman gladiator costume for next Halloween." - Joani
>I'm truly amazed at how wonderful the coif turned out. The bag is great, too. Have you used it out shopping, yet?
"We take it with us every time we go. I use it to carry other reusable bags. We get lots of comments about it, especially when they realize what it's made of." - Joani
That's really cool! Can't wait to she the gladiator next year. Congrats, Joani, on the CANTABULOUS tabistry! And, thank you deeply for the generous testimonial.
Labels:
other artists
Monday, November 2, 2009
Cloak with Hood Scarf
I finished this cloak just in time to wear to TRF for pirate weekend. I also made a hood scarf to wear with it. Later, I plan to try making a stand up collar for it when I get a chance.
Sorry about the pics. I only really wore it during the evenings at camp, so I don't have any good pics, yet. I will try to get some better ones later.
Without hood:
With hood:
Close up:
I made the fabric part out of the same polar fleece I used to weave the tabs. I worked up a new technique on this project. I found a way to increase the scallop look, which I think will turn out nice on the future collar.
Labels:
accessories
I'm back!
Whew! Still recovering from this weekend. Had a blast at faire and camping. We're already missing it. So much fun! Plus, I got to try out a few new garb additions I've put together.
I've been pondering what to do with this rainbow-colored Turkish vest I made a long time back. Never quite got around to finishing it back then. Then, I decided it would be perfect for All Hallow's weekend, which I believe is also the weekend for TRF's "Day of Wrong".
So, here I am with an "Elvira" we met:
And, with Taffy Saltwater in her awesome Steampunk outfit:
I gathered up all the brightest pieces I've collected over the years at thrift stores and flea markets for this one. I'm wearing FOUR skirts!
• The arm warmers are actually striped socks, which I cut the feet off of.
• Made the hair falls out of synthetic yarn. I'll be sharing a tutorial for the falls on my other blog here.
• The "evil eye" headdress is actually what I was told is a Turkish belt. I bought it at a flea market for $3 shortening it and tying it in the back with elastic.
• The tassels on my belt were made with poly rope and some tassel bead I found in a big jar at a thrift store. The rope is the same stuff I used to make the fluff on my masquerade mask.
Just before heading out for Pirate weekend, I also managed to finish up a lightweight cloak with tabistry shoulders and a matching hooded scarf. It came in very useful on the chilly nights at camp. I'll get some pics of the cloak up soon.
*** UPDATE ***
I have entered this outfit in two online costume contests. Not that I have any hope of winning either. But, if you want to show your support for tabistry and vote for me, check them out here:
http://www.craftster.org/forum/index.php?topic=322964.0
http://www.greenwala.com/greenwala_contests/all/10-Green-Your-Halloween/entries/all
Thanks for looking!
Labels:
costume
Monday, October 26, 2009
Jessica's Warrior Outfits
I'd like to share another amazing tabistry project sent to me by Jessica.
She sent the pics with the following description:
"I came across your website and wanted to share my tab art with you! My boyfriend and I made his shirt by gluing the tabs onto the shirt. We made it for halloween and was supposed to look like chainmail. I decided a year later that I would make my own outfit for Halloween. I went a different route and decided to weave it rather than the terrible hot glue. I am entering in a costume contest this Thursday, hopefully I win! I love all of the things that you have made from tabs and it has inspired me to keep working with the tabs! Thanks!" - Jessica
She did a fantastic job on the top and skirt! And, those gauntlets, or arm bracers, are a perfect addition. Also note the sheath on her sword and shield she is holding that is also covered in tabs and bottlecaps. Such a great outfit! I'm rooting for her to win top prize for all her hard work. It really brightens my day to see such unique and wonderful items inspired by my own work.
Now, go forth and slay more aluminum beasties!!
Labels:
other artists
Sunday, October 18, 2009
Lina's Prom Dress
To break from the usual ramblings about my own work, I thought I'd start sharing some unique works created by other awesome tabistry artists. So if you've got something to show send it on over.
I had to start with this one. Because she actually commented on one of my pieces that, I quote:
"these things are so much more creative than what I've made. Guh. Luckyyyyy."
Yeah, right. Her name is Lina Fernandez and she made her senior prom dress out of tabs in 2008. I think she did an amazing job. So, I thought I would post it here so others could tell her how awesome it really is.
She has what looks like two different weaves in the dress. As she states in the article, the skirt was made separately and the two pieces sewn together. The weave of the upper portion is a different variation than my work. I believe it is two layers sandwiched together in offset horizontal rows. I love how she handled the bottom edge of the dress. From what I can tell the vertical strands of tabs swing freely. Well, I'm impressed. I wore boring satin to both my proms.
She shares more pics of it here. And, the article about it can be found here.
Labels:
other artists
Saturday, October 3, 2009
Just a Little Something For Teacher
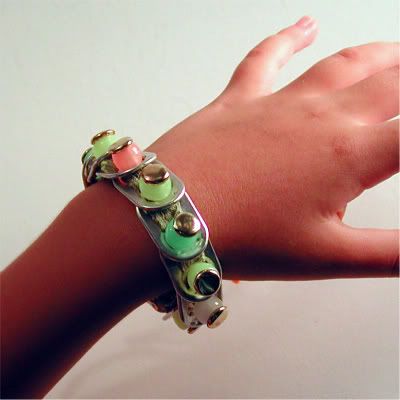
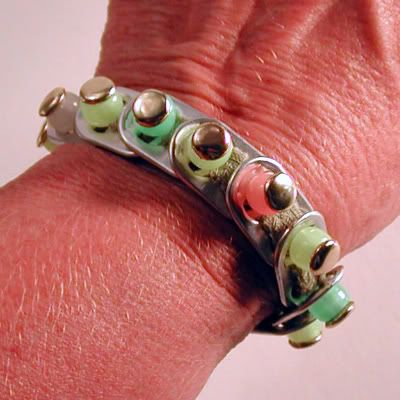
My daughter wanted to make something special for her 1st grade teacher, so she made a bracelet of her own design. While working on it, she needed a way to stop it from twisting, so I suggested a few things and we came up with this...
She choose some glow-in-the-dark pony beads and some brass brad fasteners from my supply stash. It ties on with a piece of yarn. Since she was pretty happy with how it turned out, I thought I'd post it for her. She told us after school, Friday, that all her classmates were bugging the teacher to turn out the lights in the classroom to see it glow. Anyway, her teacher liked it very much. And, now we have a new recruit collecting tabs for us. ;)
Labels:
accessories,
jewelry
Friday, September 25, 2009
"Monster" Masquerade Mask
Hello, again, all you fans of cans! We've just had our first small taste of chilly fall weather! Yay! Halloween is almost here! So, being in the spirit of spookiness, I made one of the hair holders I've been playing around with into a colorful masquerade mask using my stash of Monster (and other energy drink) tabs.
I LOVE me some anodized tabs! I used up most of my colored can tab stash on this mask. I never have many to work with because, to my dismay, they come on only energy drinks, and caffeine just doesn't play nice with me. I really like all the slight color variations of the tabs. Wish I had MORE. If any of you have any tabs to spare, I would just about beg, borrow or steal to get some more. Well, maybe just beg or trade. I've got a holiday project planned that would really be improved by some more red ones.
(BTW, awhile back I DID contact Monster about the possibility of a caffeine-free version. Hehe. The kind customer service rep actually wrote me back that she would send it on to the product development dept. for consideration. What do you think my chances are? It would probably have a plain old silver tab, anyway. DRAT!! I'm still waiting patiently for an update. ;D )
I may pick up some feathers and things to dress up the mask a little. I think a jeweled bottlecap will look nice on one side, too.
***** UPDATE 10/03/09 *****
Just finished adding some feathery decoration to the mask.
Hope it improves it. I like how the fluffy colorful stuff turned out. The idea was inspired a bit strangely. I noticed the "cracker", or tip, at the end of the poly rope whip I plaited for my daughter a while back. (The pics are on my other blog.) It got all fuzzy from cracking, as crackers tend to do. The poly rope comes in 75 ft bundles for a $1 at our dollar store. I went ahead and got some other colors (blue, red, and yellow). I may use them for other things. Can never have enough rope, right? :) Anyway, the black and white spikey stuff is plastic shopping bag. When you roll up a strip and pull it, it gets stiff and can stand on its own. I thought it was pretty cool.
Thanks for stopping by! And, have a SCARIFIC Halloween!
Labels:
accessories,
Halloween,
mask
Thursday, September 24, 2009
Hair Accessories for Halloween
While making my first purse posted just before this, I came up with this idea to make hair holders purely by accident. So, I've decided to try to make some to put in my Etsy.com store. I have experimented with two different styles. The "infinity" style with streaming ends shown here:
The ends aren't really finished, yet. I'm debating to add beads and other things to the ends.
And, the plain flat one here:
I may also lengthen the idea into tie-on headbands, as well. Since Halloween is one of my favorite holidays, they're woven with black and orange t-shirt fabric. I may add some charms or ribbon to the the bottom edge.
They are secured in the hair with a chopstick. Now that I think about it, if I had used "plarn" (plastic bag yarn) these could easily be made out of discarded chinese take-out trash. Now, what would I use the pesky styrofoam or cardboard boxes for? Hmmm... Guess I could store my hair accessories in them. :)
Thanks for stopping by. Until next post, have a CAN-tastic time!
Labels:
accessories,
hair,
Halloween
Friday, September 11, 2009
Autumn is Just Around the Corner!
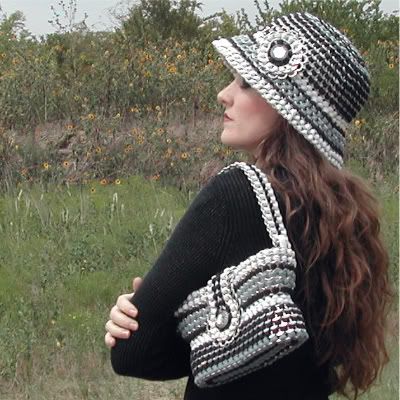
Pics are here as promised! Hope you like the new retro additions. While working on the hat tutorial I wanted to make a different style than the sun hats. And, after this hat was nearly finished it "told" me it needed a purse to go with it. (And, I really wanted to use up all the scrap from the hat) :) I'm really not one who uses a purse these days. I have a tendency to lay them down in unusual places. Oopsy. But, I've had a lot of folks asking if I'm going to make any purses, so I thought I'd better get one done. It probably isn't a very practical size for most, but I think it's adorable, anyway.
Both the hat and the purse are made from three t-shirts (black, blue and white) that I happened to have around because I keep EVERYTHING. They took most of all the shirts to make except a few small scraps. Because of the indecisive person I am, I made two styles of straps for the purse. The one pictured above is a wide strap to wear over the shoulder and the other is the two smaller handles shown below. They hook in with lanyard hooks. The purse has a bottlecap button on both sides that fasten to the removable closure. And, the hat has a matching bottlecap flower embellishment.
I lined the purse with some extra blue t-shirt I had left. And, I also added a small pocket inside.
Though you can't tell in the pics, I was very please at how my make-up turned out. I've been playing around with different looks and was trying for something a little retro 20's vampish or something. The pic below is the best angle I have due to the hat brim covering my eyes. It was very odd, not to mention sticky, wearing a turtleneck sweater, wool skirt and full length wool coat in 80+ degree muggy Texas heat. Wonder what the neighbors were thinking. :) I wanted to give the images a good fall/winter feeling. Just ignore the greenery, if you will. ;)
Thanks for lookin'.
Labels:
accessories,
hair,
purse
Thursday, September 10, 2009
POP TOP Tute and Patterns on Etsy
Finally put the POP TOP Tutorial/Patterns up at my Etsy store, which reminds me that I want to say a big THANKS, again to everyone who has purchased the "Tabistry Basics". I'm so happy it has been received so well.
http://www.etsy.com/view_listing.php?listing_id=30706194
It's been a long time editing these tutorials, but I finally had to stop making excuses and get the hat tutorial up. I'm a bit fussy and can't quit tweaking every little thing. While writing it, I put together a new "bucket" style hat that I will get action pics of as soon as I get it and a matching purse finished. Hope to have the pics taken this weekend. **crosses fingers, knocks on wood, does little dance, etc...**
For now, you'll just have to be content with this one from the tute:
Sorry, but it started growing out of my lightbox. I still haven't got the lighting just right, but the images of the construction are much better than my previous attempts.
In other news, I was also inspired to make a couple designs for some hair accessories that I may sell on Etsy, as well. With the way things are going at present, they probably won't be ready until after October, though. We shall see. I've got my garb to get ready for TRF! Speaking of faire (and I do quite often), we'll be at Middlefaire opening weekend on September 19th for their bellydance themed weekend. I think you'll be able to guess what I'm wearing. :)
So many things to make and so little time! Better get back to my tabs.
Tuesday, August 25, 2009
Tabistry Grid
For everyone's convenience, I've created a simple printable grid sheet to help in the layout of custom tabistry patterns. At the link below is an 8.5x11" PDF (105K) of the grid for common small square and round tabs. You should be able to layout staggered scale patterns as well as grid patterns using this sheet*.
http://www.box.net/tabistry
* The thickness and stretchiness of your weaving material may slightly change the dimensions of your finished piece.
http://www.box.net/tabistry
* The thickness and stretchiness of your weaving material may slightly change the dimensions of your finished piece.
Labels:
announcement
Monday, August 3, 2009
Red Sun Hat
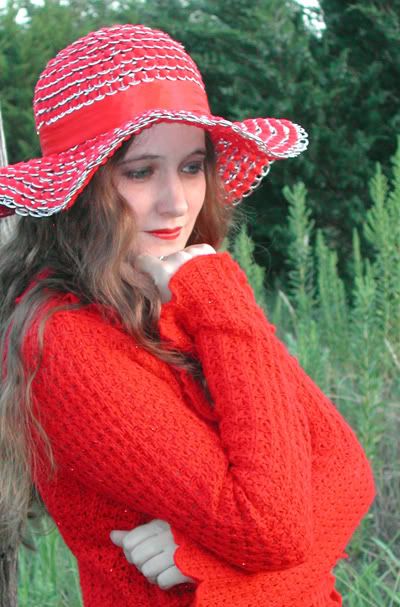
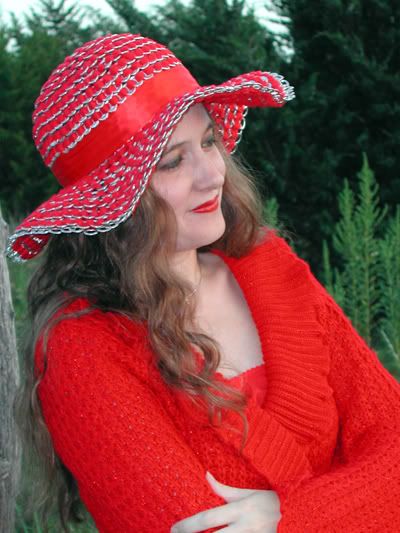
Finally got around to shooting some pics of this red sun hat I made awhile back for someone. It's really bright red, but she's in the Red Hat Society!
It's my first attempt at a floppy brim. If there's a next time, I think I will try adding some wired ribbon to the brim edge to help shape it better.
This one is made with larger can tabs and is deliberately a larger size hat. I used the ribbon with can tabs sewn to it to cinch it in like a "D" ring belt. You can kinda see the buckle in this pic along with a removable bottlecap flower:
Hope you like it. Thanks for looking!
Subscribe to:
Posts (Atom)