


Been working on the long overdue Tabistry Corset Tutorial, but got distracted by an idea to try shaping a new corset with something like gussets, or inserts. I promise, I am trying to get the tutorial done. Hey, at least this way it may come with another pattern option. :)
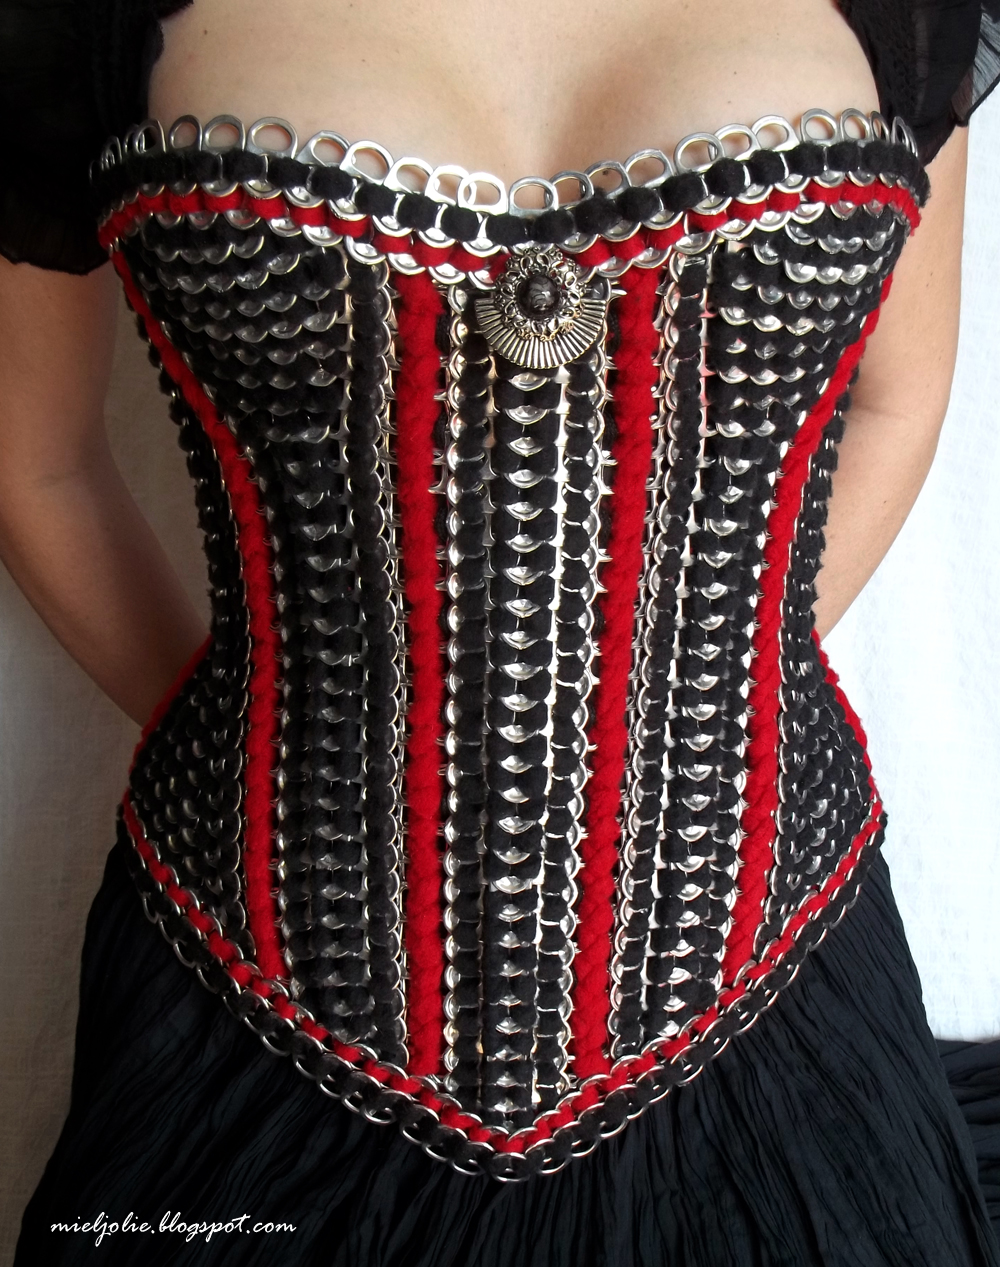
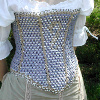
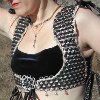
Not sure why I keep trying new styles of corsets/bodices. It's just a fun challenge for me. And, I like wearing them. (Kinda like a portable hug.) ;) I remember someone posted that essentially there isn't much difference in corsets and that all can tab corsets will look the same. I think that's a bunch of poo. And, I'd like to thumb my nose at that comment. On my previous corsets I've posted about, I'd always shaped the panels flat and joined to achieve a curve. Doing this, it was hard to alter the corset once it was woven. So, this time I tried just making a bunch of vertical strips, kinda like on the last tabistry top hat. I started joining the strips at the waist being the narrowest part. Then added in what was needed at the bust and hips. So, much easier to alter if you don't get it just right. As you can probably see, this can allow for a more drastic transition in width, too. And, I can add or subtract from the vertical strips to get the right length all the way around. Plus, it gives a bit more support for the bust, now that I can actually shape it more like a cup. Though, this could easily be made into an underbust, as well.

You can't see it, but I've got a removable wooden paintstick "busk" down the front to keep it stiffer. It really wasn't necessary, and I may not actually wear it, but it does prohibit me from slouching. That center decoration in front was just an odd earring I found. I was going to tie a ribbon bow there.

I laced it with two (actually four) laces starting at the center back. I think this is called "bunny ears"? It makes the corset stay tighter at the center to help the hourglass-shape. Oh, and sorry, felt I had to "photoshop" this last pic of the back. I only had bright neon orange shoelaces to try it on with. So, I used some magic to make them a quick red to match. Just wish I had these red laces. When I wear it on the for an upcoming event, I will probably replace this with black ribbon.
I'm really pleased with the way this one turned out. It's a great fit and easier to make/alter. Can't wait to wear this to a steampunk event in March! The only negative side to it was the number of messy looking ends to tie off on the inside, which I could have reduced if I'd put a little forethought into it. Guess I will never be completely happy. I still want to try some other styles of corset in the distant future, but I will try not to let them distract me from getting the tutorial finished. Until then, be can-TAB-ulous!!


The shaping is very nice. I also like the red, it really shows off the hourglass shape. I can't wait for a pattern, let me know if you need a tester :D
ReplyDeleteThanks! I'll probably take you up on that offer. I'm trying to keep it simple and concise, but fitting corsets sure is hard to explain. :)
DeleteIt is lovely!! I can't wait for the tutorial!
ReplyDeleteThank you, Silvia. I'll try to have to available soon.
DeleteAwesome!!
ReplyDeleteVery lovely work :D
ReplyDeleteI hope I can make things like this one day soon :)
Thanks! With a little practice and LOTS of tabs it's definitely possible. :)
DeleteMieljolie
Wow amazing! It looks great!! I really like this new style and the colors too! One of your best yet!!
ReplyDeleteThis Corset is amazing.Pls let me know when you have a tutorial available. I'm gonna start collecting tabs for this project. The Corset is perfect for me and a new challenge. I love all your creation.
ReplyDeleteI sure will. Hope to have it done very soon.
DeleteMieljolie
Hi mieljolie(honey pretty). I just discovered your site and I'm so impressed and amazed at your designs and use of tabs! I've been saving soda can tabs for a while, but we're not heavy soda drinkers in our house, so I only have a couple of small glasses full. Anyway, I read that you are willing to share some of the corset patterns? My daughter is in her junior year(college) of musical theater, and this type of outfit may come in handy at some point. If you don't mind sharing, I would love to have the patterns. Thank you, E Ziegler (Miami)
ReplyDeleteThanks! I enjoy the challenge. Yes, I offer this corset pattern with detailed construction and fitting instructions on Etsy: https://www.etsy.com/listing/150885162/tabistry-gusseted-corset-pdf-tutorial
DeleteAlso, I've been offering my 1st corset pattern for free to those who want to try it. It is this one: http://tabistry.blogspot.com/2008/06/new-bodice.html
If you would like the pattern for it, contact me through facebook or email address in my profile here. It does not include instructions, but does have a few suggestions for altering the fit.
Thanks for commenting!
Miejolie
Love this one, would love to have a pattern, I usually wear 12 boned corsets.. So this thought interests me..
ReplyDeletePattern is available on Etsy. :) Hoping to get some more tutorials up, too.
Deletehttps://www.etsy.com/listing/150885162/tabistry-gusseted-corset-pdf-tutorial
What string material is used between the can tabs?
ReplyDeleteI used 1-1.5" wide polar fleece fabric strips woven really tight. Btw, some brands shed less than others.
DeleteI so love this, found it on Facebook in a group I am on. So looked up where I could buy it, and saw what you did.. I drink enough soda I should have plenty of tops to use here soon for a couple of corsets.. THANK You so much for posting.. And Sorry I do not have a blogspot or gmail. lol Lady Aryana
ReplyDeleteThanks, Lady Aryana. It feel good inspiring others to try new things. If you do make corsets, I'd love to see them and hear your experience.
Deletehola, como esque puedo fabricar ese corsé? muchas gracias...
ReplyDeleteAquí: https://www.etsy.com/listing/150885162/tabistry-gusseted-corset-pdf-tutorial
DeleteThis is so pretty I would love to make this but I can't make online purchases.
ReplyDeleteOccasionally I do trades for craft supplies or handmade items. Contact me by personal message or email. Maybe we can work something out.
DeleteHi Mieljolie,
ReplyDeleteWow what an amazing corsets!
I really would love to make a corset, but I don't have enough tabs yet.
Also i'm more of the underbust kind of type ;) do you have any patterns for an underbust?
Thanks!!
(Sorry if my english isn't that good, i'm from the Netherlands)
Hello, Eline. I'm actually working on another underbust corset design. And, I want to make another similar to this one in an underbust style with a few changes. This one is fairly easy to alter into an underbust. But, I hope to have a pattern available before the end of this year. Wish me luck!
DeleteGood luck on your tab hunt! :)
Thanks! And good luck!
DeleteI finished making this "corset" this weekend. It was lots of fun to work on and has made me want to make all kinds of things with tabs. Thanks for the instructions.
ReplyDeleteYou're very welcome! So happy you enjoyed making it! Would love to see what all you create with your tabs. :)
DeleteI would like the pattern/tutorial I just love it!
ReplyDeleteHello! I found this online and was heavily inspired, but really want a tutorial. I went to your Etsy store through a link to this specific tutorial and saw your message about your Etsy account being suspended with no reason or notification (which I am so sorry about by the way, that’s so frustrating!)
ReplyDeleteIs there any other way that I could get that tutorial? I could try to email you if that’s an option at all
Sorry, I haven't found a suitable alternative, yet. I will post on my Facebook page (https://www.facebook.com/crafty.mieljolie/) if/when I get it figured out. Again, I apologize for the inconvenience.
Deleteany update? i have been checking on your facebook about once a month and have not seen anything about this
DeleteStill searching for a suitable alternative. :(
DeleteHi!! I'm so excited for the tutorial. I really want to make that corset before prom and I've collected 700 plus soda tabs. Update us as soon as possible!! ❤
ReplyDelete