Monday, July 18, 2011

Another Topless Hat

If you've been keeping up with the last two posts on here, you'll know I'm making some items for a RMH charity auction held in Kentucky in August. This hat is the last of these items.


It's a "topless" hat similar to the green one I made my mom. I chose this style because it is practical and easy to wear everyday, even with a ponytail. And, it would be easier to ship, too. When mom occasionally wears her own hat about town, she gets many nice comments even before they realize what it is made of.


This hat is woven with blue, white and gray polar fleece remnants to match the bag and the cozy. If you're interested, the pattern for this hat is available in my Etsy store.Link


The crown is made using a mix of larger soup and fruit can tabs and the small square ones. I used a few small blue acrylic gems on the crown to go with the large blue gem on the purse.


Above is a pic of all the items I'm sending (minus the model, of course). I was going for a set that could all be used together, perhaps on a game day.


If you're curious, the "new" model wearing this hat is a styrofoam head I picked up with an old hat and hat box. Got the lot for $5! Never know what you'll come across secondhand bargain hunting. At close inspection, she looks a little care worn, but she suits her purpose just fine for me. It's great to be able to shoot pics once in awhile without bugging the family to play dress up. :)


I'll post any news I hear about how the auction went, if I hear any. Sure hope they like these pieces and they're a big hit there. Now back to finishing some tutorials I'm severely behind on.

Purse that doubles as a Lunchbox

Last post I mentioned that I was working on some items for a charity auction in Kentucky. Well, here is the purse/lunchbox I created almost entirely with can tabs. It expands to hold a six pack of cans!


The closure is one of the bottle cap jewels I've made for my other purse and some other items in the past.


They requested a blue/white color scheme to appeal the the University of Kentucky Fans. So, I used some blue/white and gray polar fleece I had on hand. It was strange, but the fleece appears to darken slightly when woven. No idea why that is.


As you can see the sides tuck in, which is common in many purse styles. I added a removable lining made from fused plastic grocery bags. Never ironed bags before. That was an interesting experiment I'll have to work with more in the future. It worked out rather nice for a lining. Since this is also a lunch box. It will be much easier to clean and keep condensation and other liquids from dripping out the bottom of the bag.


The base of this bag is really wide to accommodate the cans. I left a little space on top for those reusable frozen ice packs. Smaller tubes/cubes could possibly be inserted between the cans.


The closure will just reach even with the cans inside. I wanted to add a zipper around the top for better sealing, but I couldn't find a suitable one that would match and work properly.


I'll be posting about the hat next time. Until then, have a can-tab-u-lous time!

Saturday, June 18, 2011

Can Cozy (or is it Koozie?)

Whichever is the correct name, it's supposed to keep your can colder longer, while keeping your hand from getting cold or wet. And, it's one of the items I'm making for Ronald McDonald House Charities' annual McDazzle fundraiser auction located in Kentucky in August.


This was a very simply item. Just a circle-shape for the bottom and a tube for the sides "ladder" joined together. Just for interest, I alternated the blue with gray and white rows.


We tested it. And, it kept a can pretty cold for a while. However, the exposed tabs did get just a wee cool on the hand. Better than bare can, but kinda strange feeling. Might have been better to turn the tabs around so less tab come in contact with the hand. This would give it a more basket-like weave pattern. You can sorta see this in the inside of the pic below.


This is the first item I've managed to finish. I'm also going to be attempting to finish a matching bag and hat. I'm planning for the bag to be able to hold a six-pack of cans. I've got it about half way woven. Then, I'll have to assemble it.

Saturday, June 11, 2011

It's raining tabs...

...Halleluiah! It's raining tabs... :)


Must apologized for the temporary break from tabistry. We just received a huge stash of tabs from our local recycler. They're the best. We hadn't been in for a while to deposit our cans, but they were continuing to save the tabs that people bring in. We normally only get a zip lock bag or two full every few months or so, but this trip it was something like 8-9 gallons! It's taken some time to clean and sort all of those and get them out of my crafting area. But, with some help, I'm finally back to making some tabistry. I was very please to see a few colored tabs mixed in there, too.

The timing of this couldn't be any better. I have a big tabistry project to complete that I volunteered to do for Ronald McDonald House in Kentucky. I'll be attempting to finish a hat, beach bag/lunch box, and a can koozie for their annual auction in a couple months.

In the mean time, if anyone near Texas is in need of some tabs, give me a holler. I think I'll have plenty to spare for a short time.

Wednesday, June 1, 2011

My New Pirate Hat


Hmmm...Now, where did I bury that treasure? :)


For Scarborough Ren Faire's Pirate Weekend, I wanted to whip up a new pirate hat. All this time has gone by, and I hadn't made myself one, yet. Finally, I got it somewhat wearable just minutes before we headed out.


Though, I didn't have the trim finished til just yesterday. Now, I need some feathers and other decorations to top it off. Can't decided what color the feathers should be. I'm thinking red to go with my corset. The flat cap that I originally made to go with the corset just wasn't doing anything for me. :)


I made this hat slightly shallower than my mom's hat that I posted about here. The weight keeps it firmly in place even on a significantly breezy day. I also decided to pin up the back on this one, as well. I tried painting some of the tabs black at the tip to reduce the amount of shiny silver showing. I also used some metallic gold shoelaces for the trim.


If you'd like to attempt your own tabistry pirate hat, I provide the pattern for my mom's hat with instructions for constructing hats (including taking measurements) in my POP TOP tutorial with 4 patterns available on Etsy.com. A tricorne is basically a wide brimmed sun hat that is pinned up to form three sides.

BTW, this month seems to be brimming with hats. I'll be posting some made-over felt hats and a paper mache one on my general crafting blog (mieljolie.blogspot.com) very soon. The SO has also just finished a red leather top hat. Feel free to come check those out when I get them posted.

Friday, May 6, 2011

Pop Tab Hair Falls

Got inspired the other day to finish a pop tab hair fall, that I started probably a year ago. I tried a few different ways to string the tabs. Most are bent in some way.


So far, they are still cumbersome to weave. Though, this could be due to my yarn choice, too. I'm still experimenting with it.


I'm working on another fall in yet another variation that is a little easier. It's just about completed. Just need to add some decor to spruce it up. I took some WIP pics of it, so a future tutorial may be available in my Etsy store soon. I'll post it when it's finished. In the meantime, my daughter and I also made some hair falls using pistachio shells.


We had dyed some with our left over Easter egg dye. It was a fun project. You can read more about that on my general craft blog, mieljolie.blogspot.com.

In other news, I'm still pounding away on the other tabistry tutorials. I just can't get the pics right to show what I'd like. It doesn't help that I have to practically create a new piece to get them. :) But, I will have something. Sorry it's taking so long. For me, it's much easier to create things than tell how it's done. Thanks for all your patience.

Friday, April 8, 2011

A Bizarre Mutation for our Craft Challenge Entry


My daughter and I wanted participate in the Craftster's "Back to Basics" Challenge together. The challenge was to make something using one or more of the following supplies:
  • Can tabs
  • Pipe Cleaner (Chenille Stems)
  • Pom Poms
  • Popsicle Sticks
For the challenge we're now dubbing our creation a "A Fan-tailed Spider-fish Dragon". However, the daughter is referring to it as a "Spagon" now. I'm really surprised how few entries there are this round. (Not that we still have any hope of winning.) Some of the submissions are pretty neat ideas. Come check out the entries and vote!

You may, or may not, be wondering how we came up with such a strange creature. Well, daughter wanted to make a pop tab spider. And, since I already work with the tabs, I wanted to try my hand at make folding paper fans with popsicle sticks. So, we compromised. I helped her with the spider...


...and made my fans on the side by myself. ;)


My daughter was very particular about the spider project. I told her that we had to work with the supplies we already had, which it just so happened we had all four of. :) Though, I told her it wasn't necessary, she actually wanted to use all the supplies listed. (However, we couldn't think how to use the popsicle sticks in this one (until we added the fan fins and tail). ;) She made a sketch of her plan.


Isn't the drawing great?! She wanted us to deviate from the drawing as little as possible. I did manage to talk her into making it a container that opens on top. It was going to be a yarn ball holder. You'd put your ball in it so you don't have to chase it around while you knit, etc...

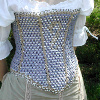
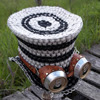
We wove can tabs together with the "shuneal" stem and attached the legs. She had to chose between orange and brown for the body. That was all I had enough of. It turned out resembling a small pumpkin before we added the legs and pom pom eyes. :)


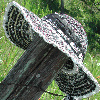
After we finished the spider, I started to work on the fans the very same day. I can't remember making any fans since grade school. I had a lot of trouble with the first one:


I used some faux parchment paper experiments that I had leftover from another project. It was regular bond paper stained with coffee and tea. I stained the popsicle sticks with brown shoe polish and hammered a small piece of brass tubing into a rivet to hold the stick together.


For the last of the three fans, I used brown paper sack covered in black tissue paper. One side is brown and the other is black. I used some gold Rub n' Buff lightly over the black side. A gold keyring is holding the popsicle sticks together.

Since we were only allowed one entry in the challenge, we wanted to come up with a way to show off both projects. So, we decided to do one of two options. Either the spider-fish dragon or a spider-shaped fan holder. :)


We unanimously agreed the spider-fish dragon was much cooler. Wish us luck!

Don't forget to vote for your favorite!

Sunday, March 6, 2011

Mardi Gra Steampunk Style - Hat and Mask


Had a costume party to attend this past Friday, so we worked on a few new steampunk items and changed up a few older ones. I was pretty stumped on what to wear to a Mardi Gras party that was Steampunk themed. So, of course I went Tribal Fusion-style as a base and added a mask and hat. ;)


I whipped up a quick mask. It kinda resembles an owl with the wispy ostrich feathers on the sides. I must thank Heather for supplying me with some of the gold-toned tabs. See, they did come in useful after all. :)


I also added a new brown feather and silver painted clip light to my hat. I wore hair flowers with some yarn falls in the back. The light came in quite useful, too. It was dark out when we got there making it somewhat difficult to put on last minute accessories beside the car.


Had a blast at the party! I'll be posting our other accessories on the craft blog (mieljolie.blogspot.com).

Saturday, February 5, 2011

100th Etsy Purchase!!

Yay! I just received my 100th Etsy purchase today!


Congratulations to the lucky buyer! They purchased my POP TOP Hat Tutorial and Patterns. But, with it, they also received the "Basics" and a Sneak peek at the Purse Pattern I've been working on, too. (Actually, they requested the instructions for the purse.) I just happened to have it almost finished and was happy to oblige. ;)

I still promise I'll get this and a couple other tutorials up and available soon.

Wednesday, January 12, 2011

Just something to show I'm thinking of you


I honestly don't care much for Valentine's Day. It's never rated very high on my list of favorite holidays. However, I'd like to share a little something, so you won't think I've abandoned my blog. I created this with my daughter out of some leftover scraps from other projects and a bamboo chopstick. I need to work a little on the flights of the chopstick arrow. I wanted to try making them out of bottlecaps. And the shaping on the top is just not quite there, yet. But, whatcha think? Does it sorta resemble a heart?

No time lately to work on any new large elaborate tabistry projects. I'm still working on tutorials and revamping my steampunk underbust corset. I'll post when I have something. Thanks for the patience.

Have a Happy Valentine's Day!