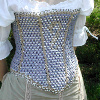


This was taken by Chris Howard at Scarby in 2013 just after I finished the first attempt. I found the stays were too short in front and the bottom tabs weren't as evenly spaced as I would have liked. Plus, in my haste I didn't get time to fix the repeating "V" pattern in lower half of the front. I did really like the black, brown, and teal-ish color-scheme.


My next set of alterations were made before just before October 2013 and worn to the Texas Renaissance Festival. Michael Lawhorn and Megan Elizabeth got some lovely shots of us outside the Sea Devil Pub for All Hallow's weekend. (If you're curious, Mr. Sam was dressed as Baron Samedi, while I went as a witch.) I tried widening the shoulder straps, which I didn't end of liking. I also changed the front by fixing the "V" pattern, making it longer and adding tabs that branch out to a fork in front. I also changed the bows on the front of the straps. (I may eventually go back the the black ones depending on my outfit.) Overall, I like the longer front. But, it had a tendency to bend forward with the poofy layers of my bustle, petticoats and the pretty brown skirt I found at a local thrift store that matched my bodice.


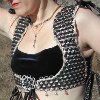
Here are two pics Moon Dawg took while we were hanging out after the parade about 6 months later at Scarby in 2014. As you can see, I went back to narrow shoulder straps, but kept them permanently attached in the back, which helped them not fall off my shoulders as easily. The only other change made was making the "tabs" along the bottom fan out more evenly by unweaving between the strips up the sides a little. Seems I got the waist too low when I made the front longer.

In this photo by Shawn Johnson, you can see we decided to repeat our costumes from the year before at TRF this past October for yet another Halloween weekend. This was the last event I wore these stays, and this is where I'm at on the changes so far. I added a busk and satin ribbon waist tape for a much better fit around the waist area. I also raised the back up and out at the shoulder blades, which supports the straps even more.

Here you can see the progression of the front. I hope it has all been improvements. You may notice it is longer now and more shapely at the waist. Not sure I will ever attempt tabbed tabistry stays again. I like the silhouette, but think I prefer shaping the sides over the hip in one solid piece.

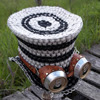
It isn't pretty, but here's a pic of the internal satin waist tape and a wooden busk used to reinforce and prevent stretching and distortion around the waist area. The stretchless satin ribbon continues all around the waist.

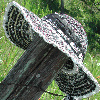
The changes in the back were the most frustrating. But, I settled on raising it up higher over the shoulder blades as is more traditional with this style. (And, as I now know helps keep the shoulder straps up and in place.) You can see how the waist tape changed the shape of my figure in back of the third image on the right here, as well. It allowed me to bring in the lace gap more without too much stress on the aluminum tabs. I've also decided on brown shoe lace for the spiral lacing. It's laced a bit tighter than I would normally lace it, and the daughter didn't get the top tied correctly, but it was pretty good for her first time helping me. I think I need to raise the start of the lacing up a wee bit at the bottom so the tabs don't pull in together like that.


It looks gorgeous! I wish I had known you were going to be at TRF; I was performing that weekend back in the Magic Garden, and would have loved to see the stays in person. I can't wait for the tutorial!
ReplyDeleteAck! I somehow deleted this: April, sorry we missed each other. I've been wanting to hear you play. Did you ever find your banner?
DeleteI should have this and a few other pattern/tutorials available shortly. Gotta figure out all the annoying issues with Etsy. But, at least I'm whipping though writing/editing the instructions. :)
I never did find my banner. I figure I'll use the loss to give me an excuse to make a new banner that's got my solo name on one side and my group name on the other. Might you be coming out to Sherwood Forest Faire this year? I will be playing the full run.
ReplyDeleteBah, Etsy. Well, yay for productivity! I look forward to the finished product!
That's too bad. It looked very well done. I guess if its loss is inspiring, it's not as big a loss. :) But, it is still a shame it's gone. I'd keep checking with lost and found, just in case.
DeleteI'm hoping we can make it out to Sherwood. Probably a later weekend. Crossing my fingers. I will look for you! :)
I don't know what Blogger is doing today, but I think I just fried my brain. :/
ReplyDeleteThanks great ppost
ReplyDeletetom armano
ReplyDelete