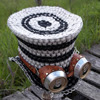
In my last post I shared the first of two hats I created for a fundraiser event we were supposed to attend last weekend. Here is the second, a wide sun hat.
The twisting effect of the crown top inspired me to try an interlocked twisting top on this hat. I made 10 chains of tabs that I wove in between each other in a kind of Celtic knot design.
I tried to carry the twisting overlapping effect onto the brim, too. This particular chain technique will flex side to side, but not give very much when bent forward or back.
I was able to insert an acrylic gem into the weave on the center top. (I like that it didn't require glue or anything to keep it in.) Though, the addition of the gem on top kinda makes the top a little pointy.
The openness of this sunhat design reduced the number of tabs significantly. This and the use of the gift wrap ribbon used really lightened the weight of this wide hat.
I think this would make a really neat effect for a basket. I've been wanting to eventually put together some designs for baskets. Wonder what else I can come up with before I get to it. Until then, be can-TAB-ulous!
Friday, August 15, 2014
Thursday, August 14, 2014
A Crown for a King (with a twist)
Made a couple new hats for a fundraiser event we were supposed to attend this past weekend. Unfortunately, I didn't feel well the night of the event and didn't make it. :(
But here is the first of the two hats. It's a king's crown.
I experimented with a few new things. I used inexpensive gift wrap ribbon to weave these. It is fairly strong and doesn't stretch, so it makes a very rigid piece, but it frays and splits easy. I doubled the 3/4" wide ribbon over to make it even stronger.
In the end I added a wire frame around the base on the inside to make the crown keep it's flared shape better and make it feel more like an inflexible metal crown. I used matching metallic gold fabric glue to add a large acrylic gem on the top. There are smaller gems attached to the tabs on the sides like I did for my "crownlace".
However, when I had finished assembling the parts, I noticed that I was able to twist the top around.
I thought that was kinda neat. And, it inspired the design of the hat I will post next.
Subscribe to:
Posts (Atom)