Friday, March 29, 2013

A tisket..a tasket...I made a pretty basket!! :D

I managed to make the daughter an Easter basket this year.  It took me a couple days to construct.  I normally like to buy the baskets 2nd hand.  You can usually get a nicer basket than what's available new in the stores around here.  And, they are pretty easy to paint and spruce up.  We also reuse the grass and any plastic eggs we get from school and such.  But, this year I decided to make her a basket with can tabs.


I've been wanting to make a tabistry basket for a looong time, but just never got around to it til now.  This basket is supposed to look like a flower with petals for sides.  (Didn't make the bunny, and had to use plain plastic eggs I found in the daughters room.)  The basket is pretty small at about 9 inches tall and 7 inches wide. 


I used polar fleece on the entire basket using a similar weave to the last corset I posted for the sides.  I think ribbon would probably be a better choice for this type of project.  Is kinda odd to have a fuzzy basket.  :)


The yellow bottom was an attempt to make the center of a flower like a daisy.  And, I was inspired on the handle by jewelry items one of our tabistry group member had posted in our facebook group.  It's worked really well for a nice sturdy narrow handle.


I tied a small flower, which is based on my favors, on the handle that I made from the scraps for polar fleece. 


I wrapped the darker pink around the end tabs to cover them.  I'm liking how it turned out softer than other edge treatments I've tried.  I think I might make some more of the flowers at a later date.  They's be cute on a headband or something.


If I had more time, I'd make some other sizes of basket.  There are so many ideas to try.  Just wish I could get things done faster.  But, alas, I must keep reminding myself I'm only human and have limits.  :(

On other projects, I'm still plugging away on the corset tutorial.  I've got some new pics that should work better, but I'd like to get a few more.  And, I've been a bad girl and started another corset that I'd like to get finished.  And, want to rework a couple other projects that I've put off. 

Have a Happy Easter!

Tuesday, February 26, 2013

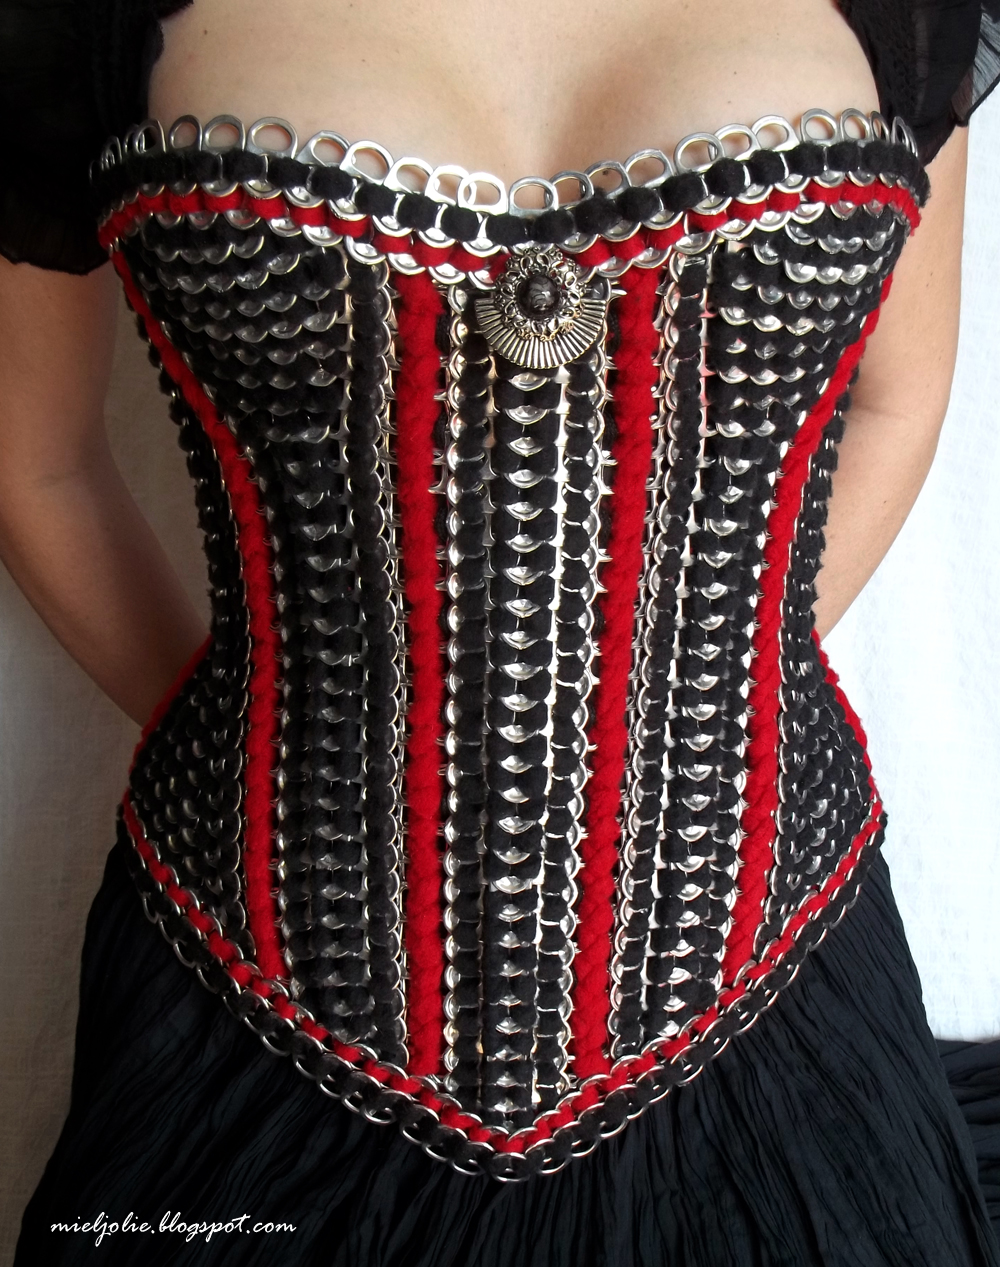
Victorian Hourglass-style Tabistry Corset - Take 2


Been working on the long overdue Tabistry Corset Tutorial, but got distracted by an idea to try shaping a new corset with something like gussets, or inserts.  I promise, I am trying to get the tutorial done.  Hey, at least this way it may come with another pattern option.  :)


Not sure why I keep trying new styles of corsets/bodices.  It's just a fun challenge for me.  And, I like wearing them.  (Kinda like a portable hug.)  ;)  I remember someone posted that essentially there isn't much difference in corsets and that all can tab corsets will look the same.  I think that's a bunch of poo.  And, I'd like to thumb my nose at that comment.  On my previous corsets I've posted about, I'd always shaped the panels flat and joined to achieve a curve.  Doing this, it was hard to alter the corset once it was woven. So, this time I tried just making a bunch of vertical strips, kinda like on the last tabistry top hat.  I started joining the strips at the waist being the narrowest part. Then added in what was needed at the bust and hips.  So, much easier to alter if you don't get it just right.  As you can probably see, this can allow for a more drastic transition in width, too.  And, I can add or subtract from the vertical strips to get the right length all the way around. Plus, it gives a bit more support for the bust, now that I can actually shape it more like a cup.  Though, this could easily be made into an underbust, as well.


You can't see it, but I've got a removable wooden paintstick "busk" down the front to keep it stiffer.  It really wasn't necessary, and I may not actually wear it, but it does prohibit me from slouching.  That center decoration in front was just an odd earring I found.  I was going to tie a ribbon bow there.


I laced it with two (actually four) laces starting at the center back.  I think this is called "bunny ears"?  It makes the corset stay tighter at the center to help the hourglass-shape.  Oh, and sorry, felt I had to "photoshop" this last pic of the back.  I only had bright neon orange shoelaces to try it on with.  So, I used some magic to make them a quick red to match.  Just wish I had these red laces.  When I wear it on the for an upcoming event, I will probably replace this with black ribbon. 

I'm really pleased with the way this one turned out.  It's a great fit and easier to make/alter.  Can't wait to wear this to a steampunk event in March!   The only negative side to it was the number of messy looking ends to tie off on the inside, which I could have reduced if I'd put a little forethought into it.  Guess I will never be completely happy.  I still want to try some other styles of corset in the distant future, but I will try not to let them distract me from getting the tutorial finished.  Until then, be can-TAB-ulous!!

Monday, December 3, 2012

It's Been a Dread-fully Long Time...

... since I've shared a tabistry project.  But, don't fear.  I haven't thrown in the tabs.  Just a little behind sharing projects.  In fact, here is my 2nd attemtp at a full-sized top hat.  My 1st large top hat can be found here and a mini one here


This pic is kinda creepy, huh?  As you'll see, I took the shots on a styrofoam head, so I thought I'd spruce up a couple in photoshop.  :)  


I've been playing with a slightly different tabistry approach this time around.  Instead of weaving the entire crown in one piece, I wove vertical pieces with black fleece that were then joined together with a dark gray fleece.  This actually took somewhat longer, but I like the subtle stripe effect.


Unlike the first top hat, this one is round on top instead of oval-shaped.  I put a bit of flare in the top by making the top larger than the crown and increasing the number of tabs in the top rows of the crown.


The hatband was an old chain belt my sis found 2nd hand for us (Thanks sis!).  The dreads were a last minute add on that were clipped into the inside of the hat using small inexpensive lanyard hooks.  There are a couple of dreads on each hook made with mostly acrylic yarn.  I think I'll make a few more to fill it in more.  Mr. Sam wore it with the dreads around the campground at the Texas Renaissance Festival for Steampunk Invasion on Pirate Weekend.  It was really strange seeing him in long hair.  :)


I'm working on getting some more can/bottle goggles finished, and I'd like to make some other larger projects.  But, wrapping up some unfinished tutorials is going to have to come first, I think.  I'll keep you posted on my progress.